
Hello everyone! As you can tell, I'm not Stephanie, I'm Emileigh from Flashback Summer, and Stephanie has kindly allowed me to contribute a guest post for you guys! I've been a follower of Steph's blog for a long time, and I love all the handmade clothing she comes up with. (So adorable, am I right?!) I also like to sew, so I thought I'd share a sewing DIY with you guys on how to refashion a too-large button-down shirt into a cute, vintage-style summer shirt.
The DIY will help you draft your own blouse pieces on the too-big button-down. It's a bit long, but that's just because I tried to be really thorough and include a giant picture for each step! (Pictures are my best friends in DIY projects.)
This idea is not uniquely mine; it was actually a very common practice "back in the day." I've found refashion tutorials for men's button-downs from as far back as the 1920s, and the following tutorial is based off a 1940s blouse pattern. Included in the pattern instructions was a tiny note in the corner of how to arrange them on a man's shirt for refashioning. How great is that?! Talk about sewing ingenuity!
Please note that the instructions will work well as a starting point, but much of refashioning depends greatly on the garment being refashioned. I'd be happy to answer any questions you have in the comment section below!
For this tutorial, here are the supplies you'll need:
a button-down shirt (2-3 sizes too big for you will work best, and men's shirts or women's without bust darts are easiest to work with) - coordinating thread - pencil - bias tape - pins - measuring tape - scissors

Instructions:
1. First, you'll need to take some of your own measurements to draw out the shirt pieces properly. You'll need:

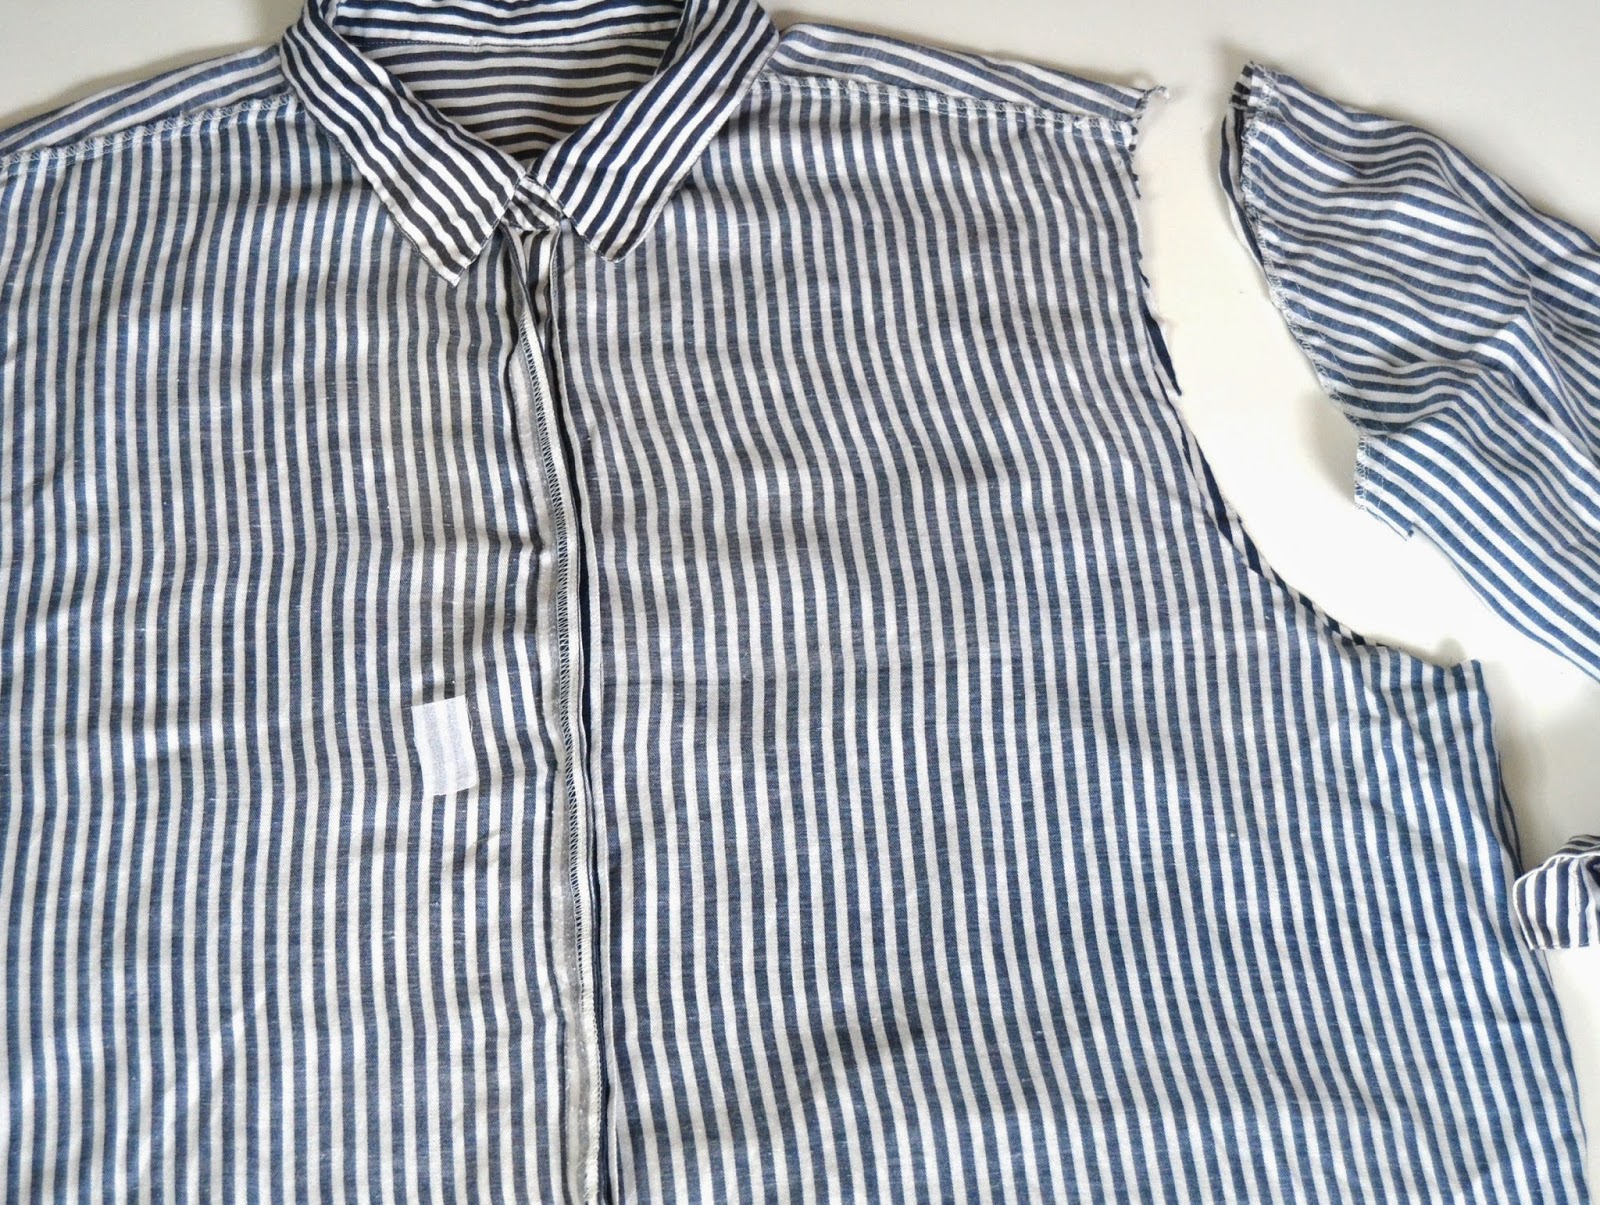
2. Next, cut off the sleeves from the shirt. This will make it easier to work with. Flip the shirt inside out. (For future reference, my shirt has a tiny interfacing patch on the inside, but it's nothing you need to repeat!)
3. Decide how wide you'd like your sleeves to be. Using your shoulder measurement will bring the sleeve right along your shoulder cap. (Increasing this measurement a little could make it look like more of a cap sleeve and could be good if you plan to add shoulder pads, for a 40s look, for example.) Take this measurement and divide by 2; measure out this length from the center of the shirt along each shoulder seam.
My calculation looked like this: 14 + 1 extra inch = 15 inches / 2 = 7.5 inches each side

4. Fourth, measure your shoulder-to-bust length and mark with pins.

5. Next, decide how much ease you would like at the bust. I would recommend 1-3 inches for a comfortable fit (with non-stretch fabric). Now add 1" total to account for a 1/2" seam allowance on each side (or more, if you prefer). Take this measurement and divide by 2, then center that measurement on the front of the shirt going through the bust apex pins.
For example, my calculation went like this:
32" bust + 1 inches ease + 1 inch seam allowance total = 34" / 2 = 17" across shirt front

6. Now take your total length measurement and add 1/2" for a narrow hem (or more if you prefer and can fit it on the shirt!). Measure this length out on both sides by starting at the shoulder, going through the bust apex pins, and drawing a line at the correct length. Connect the two marks with a line.

7. Seventh, draw a line from the bust + seam allowance marking made in step 5 straight down (or if your low waist measurement is larger than your bust, slightly outward to the end of that line on each side). Extend your lines as necessary here and at the bottom hem line so that the two meet.

8. Connect the shoulder dots and bust line with a curving line for an armhole.

9. Cut out the shape you just created with all the lines.

10. Now for darts/pleats! Depending on your measurements, this will look a bit different, and you have some options. (It gets math-y here again, sorry!)
Decide how many darts you want and where. (I put four in the front, but I would recommend 2-4 in front and 2 in back.)
Take your bust measurement and subtract your natural waist measurement. The difference is the amount of cloth you have to take in at the waist, so divide it by the number of pleats you want.
My example: 32" bust - 24" waist = 8 inch difference
8" / 4 pleats = 2" per pleat
Now around 5-6" from the bottom of your shirt (near your natural waist, or where the shirt would be tucked in), evenly space your pleats/top of darts with marks. The width of each dart/pleat will be the number you found above.
Now you're going to see how much the dart/pleat needs to narrow toward the bottom. If your lower waist measurement is larger than your hips, end your dart at 1" above the bottom of your fabric. If your measurement was smaller than your bust, do the same calculation as above but with your lower waist measurement instead of the natural waist.
My example: 32" bust - 28" lower waist = 4 inch difference
4" / 4 pleats = 1" per pleat
Measure this out at the bottom of your fabric like shown below. Connect the dots with vertical lines. These are the sewing lines for the darts/pleats.

11. Sew up all the darts/pleats and press toward the side seams! (I also zig-zagged all the edges at this point to keep them from fraying and to keep the pleats lying in the right direction.)

12. Sew up the side seams.

13. Now finish the raw armhole edges with bias tape. Use tape that is wide enough to easily manage and keep the fabric edge tucked inside. Mine was a bit narrow for this (1/2" across), but I had it in my stash and made it work. I'd recommend a larger width.

14. Lastly, turn up your bottom hem 1/2" and sew!

And Voila! You have a fitted, vintage-style shirt that will take you through summer and easily pair with cardigans for the colder months!

For example, my calculation went like this:
32" bust + 1 inches ease + 1 inch seam allowance total = 34" / 2 = 17" across shirt front
6. Now take your total length measurement and add 1/2" for a narrow hem (or more if you prefer and can fit it on the shirt!). Measure this length out on both sides by starting at the shoulder, going through the bust apex pins, and drawing a line at the correct length. Connect the two marks with a line.
7. Seventh, draw a line from the bust + seam allowance marking made in step 5 straight down (or if your low waist measurement is larger than your bust, slightly outward to the end of that line on each side). Extend your lines as necessary here and at the bottom hem line so that the two meet.
8. Connect the shoulder dots and bust line with a curving line for an armhole.
10. Now for darts/pleats! Depending on your measurements, this will look a bit different, and you have some options. (It gets math-y here again, sorry!)
Decide how many darts you want and where. (I put four in the front, but I would recommend 2-4 in front and 2 in back.)
Take your bust measurement and subtract your natural waist measurement. The difference is the amount of cloth you have to take in at the waist, so divide it by the number of pleats you want.
My example: 32" bust - 24" waist = 8 inch difference
8" / 4 pleats = 2" per pleat
Now around 5-6" from the bottom of your shirt (near your natural waist, or where the shirt would be tucked in), evenly space your pleats/top of darts with marks. The width of each dart/pleat will be the number you found above.
Now you're going to see how much the dart/pleat needs to narrow toward the bottom. If your lower waist measurement is larger than your hips, end your dart at 1" above the bottom of your fabric. If your measurement was smaller than your bust, do the same calculation as above but with your lower waist measurement instead of the natural waist.
My example: 32" bust - 28" lower waist = 4 inch difference
4" / 4 pleats = 1" per pleat
Measure this out at the bottom of your fabric like shown below. Connect the dots with vertical lines. These are the sewing lines for the darts/pleats.
11. Sew up all the darts/pleats and press toward the side seams! (I also zig-zagged all the edges at this point to keep them from fraying and to keep the pleats lying in the right direction.)
12. Sew up the side seams.
13. Now finish the raw armhole edges with bias tape. Use tape that is wide enough to easily manage and keep the fabric edge tucked inside. Mine was a bit narrow for this (1/2" across), but I had it in my stash and made it work. I'd recommend a larger width.
14. Lastly, turn up your bottom hem 1/2" and sew!
And Voila! You have a fitted, vintage-style shirt that will take you through summer and easily pair with cardigans for the colder months!
Ooh, I love this Emileigh! Thank you so much for sharing this cool DIY post. Being the tiny slender thing that I am, many shirts are too big for me. But this tutorial seems easy enough to do so maybe I can refashion a few of the adorable shirts in my closet that are just too big. I like the idea of using pleats instead of traditional darts to make a shirt more fitted, maybe I will try that in some other sewing project as well. Thanks again for this great post!
ReplyDeleteP. S. Your outfit is so cute! I love the way you did your hair and that beret is adorable!
Oh good, I'm glad you like it! I TOTALLY understand on the petite size issues. I'm also petite, and it IS an issue to find clothes that fit, especially button-downs for some reason.
DeleteAnd the pleats were a technique I found on a 1940s pattern extremely similar to this DIY shirt's shape, and I thought it was brilliant, too, so I have reused it!
oh wow, Emileigh. this is so incredibly helpful you don't even know. i've been wanting to do something like this for a while, but only got as far as the ideas rolling around in my head. thanks for solidifying them for me, this is really an awesome post!
ReplyDelete-Abigail
That's great, Abigail! I'm so happy it will help your ideas come to fruition! I'd love to see what you come up with!
DeleteThis is so nice, I m so sad I don't know to sew and I don't have time to learn, I know little things.
ReplyDeleteI m glad I found your blog it is really inspiring :).
Aw, thanks so much! I hope I'll hear from you again now that you've found my blog! I'd love to connect with you!
DeleteThis is genius! It looks super tailored yet really relaxed all at once! Glad I found your blog via Emileigh's and so happy she did this inspiring DIY!
ReplyDeleteThank you so much, Angela! And I'm glad I got to introduce you to an awesome blogger! (But seriously, follow it if you haven't already! Stephanie is great!)
DeleteI can't wait to get started on this project! The perfect use for my husband's shirts that are frayed at the cuffs. I have also seen some great vintage fabric in men's shirts in the past, but had no idea what if would ever do with them, so I passed them by. Now I know. Thank you for this post!
ReplyDeleteOh yay!!! These situations are why I created this post, so I'm glad someone else sees opportunities to try it out! I'd love to see what you make when you get around to it!!!
DeleteSeriously awesome how-to and end result, dear gal. I'm struck by how this project reminds me of the way that home sewers were urged to turn unwanted/damaged/etc men's clothing into ladies and children's garments during WW2. In other words, it has a fantastic make do and mend quality to it and the end result couldn't be any lovelier!
ReplyDelete♥ Jessica
Aw, thank you very much, Jessica! The idea is actually adapted from a 40s pattern that suggested laying the pieces down on an old men's shirt (and even showed how to arrange it)! I think it's completely brilliant, and I love how "trendy" the make do idea is now!
Delete