Showing posts with label corset. Show all posts

Tuesday, February 12, 2013

HSF #3: Under it all

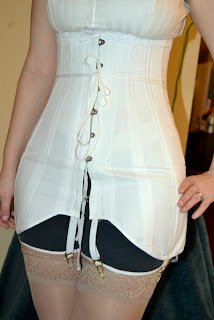
It's the end of another Historical Sew Fortnightly challenge. The theme of this challenge was under it all and I made up a 19teens corset from a pattern by Festive Attyre.


Corset! And birds! I'm wearing it over gym shorts and a tank top (plus my teens bra) because I haven't made up a chemise yet....


The Challenge: Under it all
Fabric: coutil
Pattern: 19teens corset drafted from an extant corset by Festive Attyre
Year: 1916 (ish)
Notions: steel bones, grommets (00), lacing, busk, hook and eye, lace, garters
How historically accurate is it? I used a pattern based on an extant corset, but I did use modern boning and elastic garters. I am quite happy with the historical accuracy and the shape it gives me.
Hours to complete: The mock ups took a while but the actual corset went together pretty quickly.
First worn: not yet
Total cost: ~$70


After doing research, talking with other costumers and playing around with my undergarments, I've decided to do chemise then bra and corset then combinations then petticoat (if needed).


My combinations came out really long compared to the garters on my corset plus it didn't make sense to me to have these huge voluminous legs and then squish them up under garters.


So it's combinations on the outside.


And now that I have my corset done, it's on to the real clothes! :D

Friday, January 11, 2013

Corset Progress

I've been using the last of my Christmas break to get in some real work on my corset! I'm planning on using this piece as my Historical Sew Fortnightly challenge #3 which isn't till February but I know I'll get busy once school starts!


I got all of the boning channels in! It was a long process especially since I made the channels from the leftover coutil.


It looks so pretty! :D


I did have one issue. I must have messed up the width of the boning channels a bit because I wasn't catching the fold of the fabric so I added another row of stitching 1/8" outside the boning channel. Let's call it "decorative". ;)


I also had another undergarment mishap. I finished my bra but the bottom waist band was too small! And it ended on my ribs so I knew no amount of diet or corseting was going to fix the issue. So I added a small gusset on each side on the under arm seam. It fits now and the fix is mostly hidden.


Bloggers with feline accomplices often note how their kitties always know when expensive fabric is around! I think my birds have the same sixth sense.


They could not resist a large piece of white, freshly washed and ironed piece of coutil! So I bribed them with some fabric scraps. Hopefully, this will keep them away from the finished corset!

Thursday, January 3, 2013

19-teens Corset Muslin

I've been working on my 19-teens corset. I finally got my bones in so I could do a partially boned muslin.


I ended up only boning the center front where the busk would be but it was helpful in fitting! I used 1" seam allowances for easy of pinching and pinning. This is the final fit right side out. It ended up being big in the hips and bust. lol Go figure!


I chose a stripey cotton for the muslin because it was a bit thicker and stronger with no stretch.


My lacing strips sure came in handy! The lacing gap isn't perfectly parallel but I think with the real deal, we'll have more squishing power and it'll be ok. Plus, I don't really want to change the shape too much.


The only other change I'll need to make is take .5" or so off the top since it is poking up too high.


My coutil has arrived so I can get started soon! I'm so excited! :D

Thursday, December 20, 2012

In which my husband helps make a corset

The goal for my Edwardian sewing is to get as much work done over Christmas break as possible done on the underpinnings. For the brassier, I'm using a free pattern by Historically dressed.


I started by making a muslin just straight from the pattern and it turned out quite big. Above is my pattern pieces after all of the changes. I did end up changing the back neckline so I have more options for evening gown styles. The original is quite high. I found a lovely extant bra from this period on pinterest that has a v neckline in the back so I felt justified in my modification.


Here is my latest muslin. I'm half way tempted to finish it and turn it into a cute retro crop top (to be worn with a regular bra underneath of course!) since the cherry plaid print is so cute! It's funny out underwear from one period is more like outerwear from another.

For the corset, I'm using a free mid 19-teens corset from Festive Attyre. (It was her pinterest board of the bras too.) The pattern is hand drawn on a grid that needs to be enlarged to 1" by 1". My husband saved the day by doing fancy graphic design magic on it to get it enlarged and to print tiled like a pdf pattern. (In his words "enlarged in photoshop, saved as a pdf, printed as a poster in adobe acrobat".) So if you don't have a talented graphic designer husband/friend/coworker/etc, you won't be able to enlarge and print the pattern on a computer. Jen of Festive Attyre said that she used a copy machine to enlarge it so you might have better luck going that route.


She also has laid out a handy dandy chart on how to grade the pattern up or down to whatever size you'd like.


I also made a set of lacing strips as suggested by Jo of Bridges on the Body in her 1911 corset sew along. Can I just say that I HATE setting grommets. For my last corset, I upgraded from whatever grommets they sell at Jo-Ann Fabrics to grommets and a grommet press (the cheap kind) from a corset website (I've forgotten which one) and it sucks. I have to hammer the dumb press until the grommet starts to bend like it needs to, then carefully remove the whole piece from the press without the back part of the grommet getting stuck on the press and the whole thing falling apart and then hammer the grommet again. Oy.

Thankfully, after the first strip (and wasting about as many grommets as I actually set in) my wonderful husband stepped in to help. It went much smoother and we only had one wonky falling apart grommet to do over on the second strip! Woot! Guess he has the magic grommet touch....or I just have the upper body strength of a small ten year old.....


Anyways, I whipped up a muslin in some red striped quilting cotton. I picked this fabric because it was an appropriate length (about 1 yd) and it was a bit thicker and so would be a bit more durable for fittings. I did not attempt any strip matching so those lovely looking chevrons are just by accident.


I used 1" seam allowance as suggested by the Bridges on the Body sew along. Now I just have to baste the lacing strips on there and wait for my bones to come in so I can use a few to fit my muslin.

Wednesday, October 31, 2012

Happy Halloween!

Happy Halloween! This year, I wore my little red riding hood costume but with a few changes from last time. Wearing my red peasant dress as a skirt turned out to be a bad idea since the boning poked me under the corset and got painful by the end of the day.


I redyed the now green linen that turned out all splotchy last time and it came out sooooo much more even. I pleated it up onto a waist band and instant skirt.


The corset was a big hit although people kept asking me if I could breathe all night.... Yes, I am talking to you without breathing. *insert sarcasm here*


I had heaps of fun anyways. Halloween is a costumer's favorite holiday, after all!

What did you go as for Halloween?

Monday, October 15, 2012

A Cape and a Kilt

It's hard to tell if the weather at the end of October is going to cooperate or not but it did this past weekend so I could wear my latest costume!


It's little red riding hood.


Me-made cape and skirt from peasant dress
thrifted blouse
leather corset Brown Cow Art


The cape was made from red stretch velveteen and black taffeta. Not my first choice for a fabric combo but it was stash busting and I made it work.


All in all, it was a quick cheap costume to go with my new corset!


My husband was super excited to wear his new kilt.


And I was excited that he decided to buy all of the pieces for this outfit! I was not looking forward to all of that pleating.

Monday, September 3, 2012

If you can't wear a pretty dress, you might as well go shopping

Since the forecast for today was overcast and rainy, this Renaissance Faire trip was not a good one for costumes, but we made up for it in shopping! :)


My splurge for this year was a lovely leather corset from Brown Cow Art. It makes my waist look like it's been photoshopped. :) And it's not even nearly as tight as it could be. I'm sooooo happy that I was good at Jo-Ann's this weekend and only spent $10 instead of bringing home the 6-10 yds of $10/yd fabric that I fell in love with.....


The lady who helped me was very enthusiastic and let me try on several corsets before I found one I liked. Of course, now I need some appropriate clothes to wear under my corset.


My husband's big purchase for the season was a kilt and accessories. He's been wanting one for a while and aside from the fact that wool is ridiculously expensive, I have zero desire to do all of those pleats so he opted to buy one instead.


I also got some accessories for my new Renaissance costume.


I got earrings to match my growing collection from Stillwater Chainmail.


A nice black belt from Blue Flame Leather.


And a leather pouch found at a corset shop of all places (Renaissance Fashions). It's not nearly as nice of a quality as the leather from Brown Cow Art or Blue Flame Leather but I really wanted this size and shape and it was not too pricey either.

If you missed last year's haul, it's here and here. To catch up on all of my Renaissance costuming adventures, set aside a few hours and start here.

Friday, July 13, 2012

Corset!

I finished my new corset! The pattern I used is Simplicity 2621 in size 14 but I took 1" off the center back.


Yay for a nice columnar shape! I've been wearing it around and it's pretty comfortable. I still haven't figured out how to make this kind of corset with amazing gravity defying properties so I'll have to wear a modern bra. That works out for me anyways since I have to get dressed outside at the Renfest. I definitely can't wear hoops in the car!


This corset is a bit big in the upper back just like my last one. Not sure how to fix this problem....But this one isn't to bad. The sides touch but there's no gaping up there. I doubt I'll keep the purple ribbon for the lacing but that's all I had long enough laying around in my stash and I really wanted to try it on.


Now I just need to have my husband lace me up good one time so I can measure myself with my new corset and get on to fixing the rest of the costume. It's so hard to lace up your own corset!


Here's mine from last year. Very pretty but too big.


Do you keep any pieces that don't fit you anymore?