Showing posts with label italian. Show all posts

Friday, July 15, 2016

IRCC Update #3

I feel like I was quite productive this month despite being rather busy with planning a move and trying to declutter before packing. Anyways, my first goal for this month was to finish my first accessory, a pocket. I ended up trimming it with some green velvet ribbon from my stash. I don’t know that green really goes with the rest of my outfit but as this will be worn under my gown, nobody is going to see it and I like green.


The ribbon was applied by hand after the main construction of the pocket was complete. It wasn’t until after I’d sewn and pressed my pocket that I bothered to look at my old pocket to see how I’d made that one. Last go around, I was smart and applied the trim before construction so the raw edges were finished nicely inside the seams. Oops! So I had to fold under the ends of the ribbon at the seam. It doesn’t look as nice but I guess that’s what I get for not paying enough attention!


I folded over the raw edges on the top of the pocket and hand sewed a length of ribbon over it to finish the edge and make a belt. And the pocket is done!

My next goal was to make my camica this month. Not going to lie, this was a part I was not that excited about making. I am not one of those people who loves making underthings and I’d just made a gorgeous linen camica last year and have barely worn it. But, really, you can never have too many sets of undergarments and I did already have a tutorial handy to follow. I used Festive Attyre’s camica tutorial.


I decided serge all of my seam allowances on the camica and do the bulk of the sewing by machine. I do a lot of outdoor events in the heat and love just being able to throw my under layers in the washing machine after an event.


Look! A gusset! If only my geometry teacher had made me do equations with camica pieces, I would have enjoyed math so much more.


The thing that I knew I wanted to change from my last camica was the neck band. It came out too wide and all twisty and lumpy. So I decided to make a very narrow neck band this go around. The neckline was machine gathered and then machine sewn to the neck band. I finished the inside of the neck band by hand.


So far, I have also hemmed the camica by hand. The only bit left to do is finish the sleeves. I haven’t decided whether to gather them to a wristband or to just hem it and leave it open. Once I make up my mind, it’ll be a quick finish.


I also started on my giornea. I used a tutorial by Cathelina di Alessandri to make this garment. I liked that it was simple geometric shapes that would be easy for me to draft and sew up. Since this garment is not that complicated, I’ve been able to finish the main construction by machine very quickly. I’ve decided not to line my giornea because it’s quite heavy already. This leaves me with a lot of edges to finish prettily since they can be seen while the garment is being worn.


The center front and center back edges are selvages so I’m just slipstitching them down by hand. The neckline, shoulder seams and outside edges, I’m finishing with bias tape made from leftover linen from my petticoat which is almost an exact match for the giornea fabric. The bias is sewn to the edge by machine and then folded over and slipstitched by hand to the inside of the garment.


Looking forward to the next (last!!) month, I need to finish my camica and giornea. I also realized this week that while I have fabric for sleeves, I haven’t really given much thought to the design of the sleeves. Definitely need to work on that! I also still want to do some sort of jewelry to go with this outfit. I’ve not made jewelry before but if I have time, I do want to take a stab at it.

Monday, June 13, 2016

IRCC6: Update 2

I can't believe it's been another month of the Italian Renaissance Costuming Challenge already! I had grand plans for progress this month but some things came up so I didn't have as much sewing time as I wanted. But I still did complete some things for this challenge.


My first goal for this segment of the challenge was to hand sew all of my eyelets. I actually did them at an event so they went pretty fast! And I got to talk to some of the other ladies about how I make my costumes so win win.


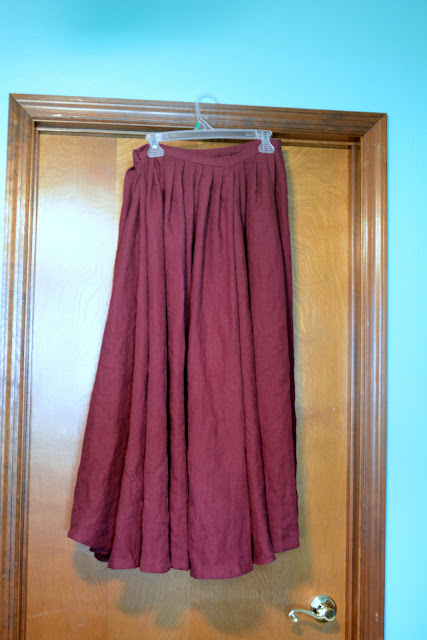
One of the things that put a bump in my sewing plans is the fact that our moving date got shifted from late September to mid August which is right at the end of this challenge. So in addition to extra moving related activities this month, I'll be loosing quite a bit of time at the end of the challenge too. So I decided to do a bit more machine sewing than originally planned. I did handsew together the panels of the skirt together but I assembled the facing and attached it by machine. The skirt is just two 60" widths of linen sewn together. I used the selvages as the edges so no need for any sort of seam finishing.


 I ran one row of running stitch across the top of the skirt and gathered to make tiny cartridge pleats. Then I hand stitched the skirt to the bodice and hemmed the skirt to finish the dress.


So far, I'm very happy with how the dress is turning out. I still have to get a lacing for the bodice and make sleeves but so far it looks really nice.


I also finished my petticoat which needed a hem and a hook and eye closure at the waist. I'm very proud of the fact that I hand sewed this piece 100%. I don't do that very often, but when I have time, it is very fun.


Next up, I started my pocket from a bit of grey wool I had left over from another project. I love my pocket pattern because the pocket ends up being large enough to hold all of my mundane things like cell phone, keys and money.


I've sewn up most of the pocket by machine but will be hand applying trim once I decide on which trim I like best. I always have such a hard time deciding on trim options! It's too hard for me to visualize the finished project.


 I also purchased the linen for my camica. I'm glad I ended up waiting because I got some on sale. Due to my new moving date, I'll probably do most of my camica by machine but I hope to have it and my pocket done before the next update.

If you missed update 1, you can find it here.

Friday, May 27, 2016

Italian for Summer

This weekend was our monthly Adrian Empire event. The forecast was hot and humid with a good chance of rain so I dressed accordingly.


I decided to Italian-ify another of my English gowns. I've really been loving Italian garb, especially for this climate. My linen camica is just a dream to wear! The breeze goes right through it, leaving me nice and cool.


Not to mention that I find Italian looks effortlessly elegant while the English tend to look more prim and proper. I'm not sure why but it may have something to do with the lovely hair dos. Mine is still too short to do anything fancy but a snood and a hair piece make for a passable style.


And Italian jewelry is so pretty! I couldn't help but bling myself out a bit even though I was going for a more lower class look. Period appropriate looking jewelry makes my heart go pitter patter so I'm always on the look out for new pieces.


Often when I'm in costume, people ask if it's comfortable to wear. And I tell them that it depends. If your clothing is made to fit you and is functional, it's quite comfortable. If it's ill fitting and poorly made, it will be terribly uncomfortable! This dress had a boning pop out the top of it's casing and was poking me in the arm pit the last time I wore it and it was painful! Thankfully, it was an easy fix and this dress is back to being super comfy.


It's important to remember when doing historical costuming that ready to wear is quite a new concept! Clothing would be made to fit you or you'd remake a handme down to fit you. Most ladies would know how to sew or could afford to pay someone to tailor it to their bodies. Unfortunately, we are so used to ready to wear that many purchase ready to wear garb and end up with uncomfortable things! If you've ever heard some one complain about uncomfortable corsets, I can almost guarantee they bought ready to wear or did something silly like lace it way too tight on the first go.


This dress has 6 steel bones and fits like a firm hug. It supports and shapes me while still allowing me to do many everyday activities with ease. I won't be doing any yoga in this dress but that's ok.


You might think I'd rid my costuming closet of wool now that I'm in Florida but I'm actually wearing too bits of wool here. The soccia or pocket is made of wool and adds no warmth to the outfit. My apron is also wool. Since wool is water resistant and smolders instead of bursting into flame like linen, it's great for aprons.


So while I don't plan on making any wool dresses in the near future, I do enjoy having some wool accessories. To combat the Florida summers, it's linen all the way! While some people choose cotton due to budgetary restrictions, linen is cooler, more durable and period accurate to boot.


Personally, I'd rather wait until I could afford linen to make a new dress than to cut corners on fabric content and make more dresses. Summer is just too hot for polyester!! (Except for whatever my faux hair is made of. I'll keep my hair piece.)


 So I probably won't be making as much garb this year but I am making a new Italian Renaissance gown so be sure to check out my IRCC6 posts to see how it's coming along!

Friday, May 20, 2016

IRRC6: Update 1

It's time for an Italian Renaissance Costuming Challenge 6 update! It's just past the one month mark so far.

I decided to start on the petticoat first to test out a new cutting layout and new hand sewing techniques. Usually, I just pleat 3 yds or so of fabric to a waistband but I tried a pattern with gores and I rather like the effect. I also decided to handsew the entire petticoat. I used a running stitch for the long seams and hand finished them by trimming one side, folding the longer side over top of it and slip stitching it down.


 I then knife pleated the skirt to the waistband and attached with a backstitch. I still need to hem it but I’m going to wait until the gown is done so I know what length to hem it. I was pleasantly surprised at how fast it stitched up but I haven’t decided how much of the rest of my ensemble I want to hand stitch.


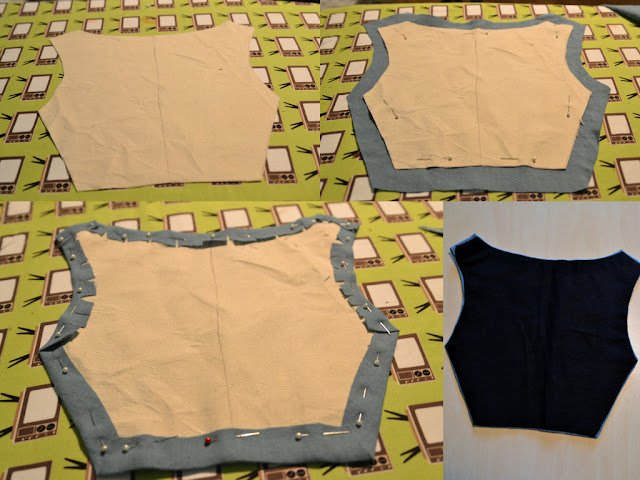
Next, I started work on the gown. I used an existing bodice pattern from an English gown and shortened it to get the raised waistline I wanted. For the inner layer of the bodice, I used some cotton canvas. I used six steel bones on the bodice front for a bit of extra support.


I then cut the outer layer, folded the seam allowance over and catch stitched it down. Then I cut the lining fabric (some linen cotton from my stash), folded the seam allowance down and slip stitched it down. Next up is sewing it all together and then eyelets.