Monday, January 27, 2014

On contentment

I didn't make any resolutions this year because I've been trying to work on contentment this year. Today's society is very much a buy, consume, throw away and buy again. Studying the past can really open your eyes to how little people lived on compared to how much stuff we "need" now a days. On top of this, I don't like feeling like my happiness is based on having stuff.


Last semester while I was working on my thesis, I realized that my sewing often followed a similar pattern to most people's shopping habit-buy, sewn, wear, hang in closet, MUST HAVE NEW CLOTHES, buy again. It wasn't fun but rather stressful. Not to mention that I'm at the point where I have enough clothes to wear vintage style everyday. There are still a few gaps but nothing that I need right now.


I want to take things slower, sew for enjoyment and think strategically about what I sew and not just *mustsewallthethings* all the time. I've been inspired a lot by Rochelle of Lucky Lucille's 12 Pattern Challenge to go back to my TNT patterns and drafting using them as a base rather than having to buy new patterns all the time. I know what features and styles look good on me and it's time for me to get back to them and just experiment occasionally.


I also want to spend time doing other things. Sewing is often a one person activity and I want to do things that my hubby and I can do together even if it's just watching a movie at home. And there are other things I used to do like reading that I don't anymore because all of my free time is sewing.


So, this year I'm focusing on enjoying things that I already have. Rediscovering old loves and being content with having less rather than always feeling like I have to have more. It's about appreciating the good things in life I already have instead of day dreaming of bigger and better.

Thursday, January 23, 2014

HSF #2: Innovations

Yup, that's another Historical Sew Fortnightly project up already! The inclusion of 1939-1945 is going to help my challenge count out a lot, I think. Anyways, here it is!


For my innovation, I choose my favorite fabric ever-rayon! While rayon wasn't brand spanking new in the 1940s, there had been some improvements in the manufacture of the fabric that made it grow in popularity even before war rationing limited seamstresses' access to other fabrics. For more info on the history of rayon, check out The Dreamstres' post here.


The Challenge: Innovations
Fabric: 2 yds red polka dot rayon ($7/yd) I also got some of this fabric in the green color way for a dress later in the year
Pattern: Wearing History's Dahlia 1940s Gathered Blouse pattern
Year:1940
Notions: 4 snaps (stash)
How historically accurate is it? Very! But that's pretty easy when you have access to period patterns, period type fabric and you are doing a period when the sewing machine was popular.
Hours to complete: Oh, I never keep track of these things.
First worn: January 2014
Total cost: $14


 I'm super happy how this blouse turned out but I did have some trouble with it. Part of the issue was that the rayon I was using was very slippery and I was too lazy to cut it one layer at a time. This pattern is one of the Resto-Vival patterns from Wearing History which means that while it has been multi-sized and translated from unprinted to printed form, it does come with the original period directions. I have found that there can be a lot of difference between late 30s/early 40s patterns and war era 40s patterns in terms of amount and quality of directions (and fit too but that's a whole different issue). So be warned that from a direction stand point, this may be a more challenging project.


I was able to get the fit very well. I'll be doing another post later on how I did an FBA-type adjustment to this pattern because that took a bit of brain power since it's a wrap style with no darts. The worst fitting part for me had to be the sleeves. I know from previous work with early 40s patterns that 40s sleeves and I do not get along well. I almost made it short sleeved from the start but I really did want this to be a winter top so I went ahead with the 3/4 length sleeves.


Alas, I over estimated how much ease to add and the wider sleeves just looked silly with the rest of the blouse. I really do feel like this style needs more fitted sleeves to balance out the draping on the blouse. Since I'd already set in the sleeves by the time I figured this out, I just chopped them off to short sleeves. I may go back and add pleats to the sleeves like in one of the other views, but as I didn't get to the sleeves till the night before I wanted to wear it, that didn't happen yet.


 The draping turned out beautifully! I was a bit nervous during the construction process since it didn't look as drape-y as the illustrations but the true beauty of the draping on this blouse doesn't really shine till it's on a person. The neckline is lovely. It's high with out being constricting and awkward. I also loved that the edge of the wrap part is cut on grain, rather than on the bias so you don't have to worry about crazy bias stretch!


The directions and yardage for view c are designed for it to be unlined and pieced so if you have a fabric like mine that has an obvious wrong side or you don't want to piece your tie, plan on some extra yardage. 

Overall, I'm very happy with this pattern and will probably sew it up again! It's definitely not a beginner pattern, but it's worth conquering for a more practiced seamstress.


The skirt is also a new piece that I made to go with this blouse. It's Simplicity 3457 which is a late 30s/early 40s 12 gore skirt pattern that I made up in a black fine whale corduroy. It was really fun to sew up and I'm glad to have a basic black skirt in my closet finally!

Monday, January 20, 2014

HSF 1: Make Do and Mend

Originally, I wanted to do something 40s for this challenge but I decided to focus my energy (and free time over Christmas break) on making do with a bigger project.


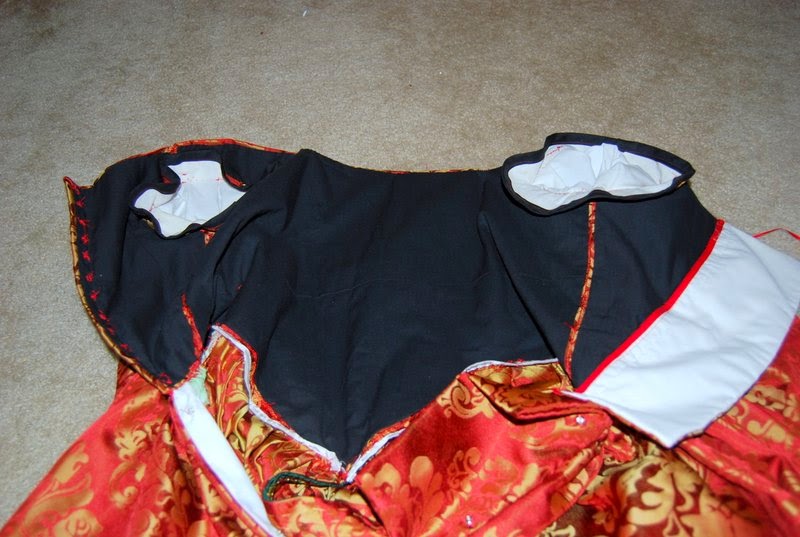
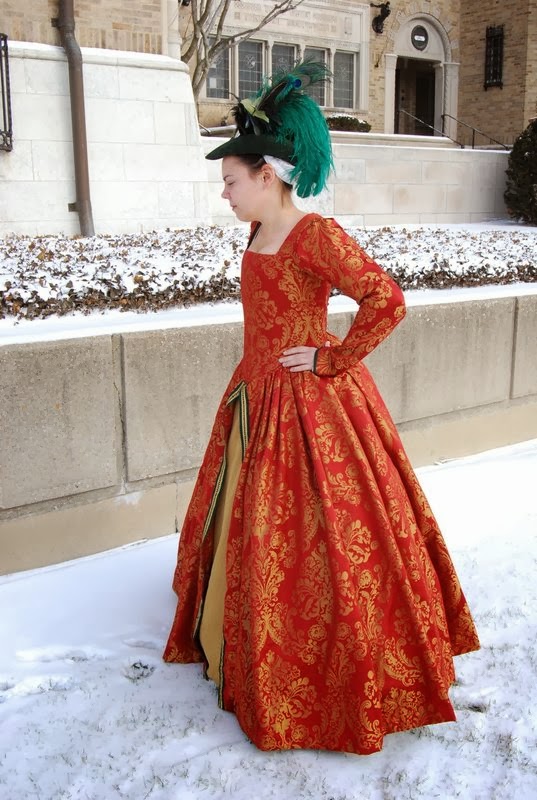
Oh, my Elizabethan court dress..... It started out as a Tudor dress (right) back in 2011 when I'd only been sewing for about a year. The construction was fine (although it took forever) but the fit was not so great especially since my corset was too big. The right is the Elizabthan-ified version of 2012 after I'd lost 30lbs, made interchangeable sleeves and got a new corset. But it still really didn't fit well. I only wore it once last year to a ball and I knew that it needed some serious work before it could be worn again.

I decided to completely scrap the bodice and use my gray wool kirtle as the supportive undergarment rather than the second corset.


Tada! New bodice!


The Challenge: #1 Make Do and Mend

 I had to piece a lot of the lining but waste not!

Fabric: Leftover fabric from making the dress the first time, cotton scraps from another project for lining and leftover cotton twill for interlining


Pattern: I drafted it from a combination of the original bodice pattern (Simplicity 2589) and my gray kirtle pattern.


Year:  Tudor/Elizabethan (ie second half of the 16th century) depending on what sleeves and headgear I use

Notions: red thread from stash, plus I reused the bones from the original bodice


How historically accurate is it? Well, the outer fabric is polyester and the lining and support layer are cotton so not so good on the fabric. Red and gold were popular colors during the period so that's good. The shape is much better with the new underpinnings and newly drafted bodice.

Love the new shape on this dress! 
There's still a bit of curve near the bust, but that's perfectly period.

I also did much more period construction on the new bodice. I made it the same way I made the kirtle bodice. The biggest thing I wanted to improve (after the fit) was to do hand eyelets instead of using huge ugly grommets. So much nicer looking now!

 I did dig out the old modesty panel from the original bodice and added it in after the photo shoot. And I'm going to have my husband practice his lacing skills before faire season. It does, in fact, lace all the way closed except for right above the waist seam.

 No more gaposis!

My original idea for interchangeable sleeves were to attach lacing rings to the armscye and the sleeve head and tie them together. It was a major fail! They were super fiddly and the sleeve facing kept poking out. This go around I decided to lightly whip the sleeves in. It's a bit more work when it's time to interchange them but they function much better when in.

You can see the whip stitches but I'll follow the old costumer's adage-If they're looking that close, kick them!

The original skirt I kept the same except adjusted the pleats to fit the smaller bodice waist. It was partially hand sewn and partial machine sewn to the original bodice and I hand sewed the entire thing to the new bodice. The rest of it is the original machine stitching from when I first made the gown.


Hours to complete: I lost count. It was a lot of hand stitching but it went a lot speedier than my first go at a mostly hand stitched piece.


First worn: January 2014 just for pictures

Total cost: $0 everything was leftovers from other projects.


 I'm so happy that this dress is wearable again but it still needs some major trimming! I don't have enough of the trim from the old bodice to trim the new bodice so I'm going to have to start from scratch. Shucks! I have to buy yards and yards of trim.


 Not to mention, I was never very happy with the particular shade of gold I used when trimming this gown. It reads a bit tacky halloween costume.


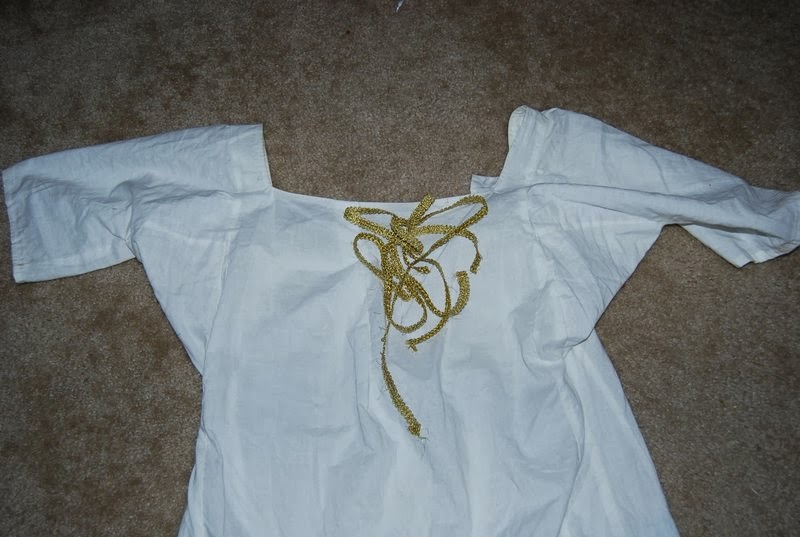
Speaking of trim, as part of the make do challenge, I also removed all of the scratchy gold trim off one of my shifts. You couldn't see it anyways.


 I'm thinking something gold that more matches the gold in the dress fabric plus pearls! I loved beading my 19-teens does Elizabethan fancy dress.


You may have noticed an Eizabethan explosion on my pinterest this week. I may or may not have spend most of my free time this week "researching".


 Yay for having the hard part of this dress done and just the fun part left!

Friday, January 17, 2014

HSF 2014: Thoughts and Plans

I really want to be more organized and focused with Historical Sew Fortnightly this year. Unfortunately, it doesn't look like I'm going to make it to Costume College this summer so I've decided to focus most of my costuming efforts on Elizabethan things I can wear to the Ohio Renaissance Festival.

I really want to focus on a wardrobe of pieces that I can mix and match to form different looks for different days with different weather conditions. Here in the great state of Ohio, it can range from 90F to 50F for the high during the Renaissance Festival so I really do need a bit of everything!

As I've already posted about before, my court dress needs some work. I've actually finished the new bodice for Challenge #1 but I'm a bad blogger and haven't got pictures of it yet. (I blame the bad weather.) It's going to need new trim but I'm going to save that for another challenge.

The Ren Faire Prep Check List:

1. Retrim Court dress

2. Remove lacing rings from red peasant kirtle and do eyelets instead


3. New shift


I have two shifts, both cotton and neither of which fit well. I'd love one with a ruff and cuffs (and maybe blackwork.

3. Aprons

Ideally, I'd like two-a more basic one for my peasant ensemble and a blackwork one for my middle class impression.

4. More black work projects


I'm thinking an embroidered coif and partlet set would be fabulous.

5. Linen jacket


I'm quite in love with the linen waistcoat from the Tudor Tailor. Lauren of American Duchess made the jacket on the right which I am quite in love with.

6. A fitted English gown


Also in the Tudor Tailor. I'd really love to do one of these in velvet, but I'll probably end up doing a wool one first and do a velvet one once I've had more practice. Lots of people do black ones but I've seen some more fun colored ones in period sources so I think I might go that route.

7. More kirtles

Now that I've "cracked the code" so to speak on kirtles, I want to make more! I have a few yards of wool in my stash that I originally bought to make a suit with but I'm not sure it's really the best fabric for the original pattern. It may end up as a pretty kirtle instead.

8. Gold Bullion Embroidery Muff


I started this last year at Costume College and actually got pretty far on the embroidery before I ran out of one of the threads and it ended up back in the UFO pile. Really want to finish this one up

I'm sure I'll also throw in plenty of 40s projects too. Actually, the next two challenges are going to be early 40s. But these are easier and need less planning.

Thursday, January 16, 2014

Unseasonable Attire

I know it's the middle of winter but everyone loves a novelty print so I opted to wear my BBQ dress for day two of the expo.


I love love this dress! I paired it with my American Duchess 23skidoos. Love these shoes but I wish I'd gotten some squishy inserts for them because that concrete floor was HARD.


I realized this weekend that I have a huge wardrobe gap- no red hat! Seriously! How did that happen? Giant white hair flower to the rescue.


I miss summer and picnics and sunshine!


Ah, well, at least I got to pretend for one day!

Monday, January 13, 2014

Sunshine, Daisies, Butter Mellow

This weekend, the hubby and I were at a huge 2 day bridal expo. I didn't get awesome photos because we had way too much stuff to lug around with out adding a camera on top of it all. So iPhone photos it was. This outfit was just too cute not to share!


I rocked out my cherry print Bernie Dexter dress with pops of red and a great yellow hat. This hat is so fabulous! You can't see but there is a yellow swirly ribbon and some great pearl details on it!

P.S. Extra nerd points to anyone who knows where the title for this post came from.

Friday, January 10, 2014

On My Sewing Table

Just a few things I'm working on right now....


Wearing History's Dahlia Blouse in a gorgeous red rayon


A 3/4 circle skirt waiting to be hemmed.


And my birdies! They cannot stay away from my sewing things. Recently, Rachel (left) has decided she loves my sewing machine. She'll climb up the power chord up to get to my sewing table and then sweet talk to my machine. Silly bird!

Tuesday, January 7, 2014

Knit For Victory

Despite the fact that I wasn't able to get started on my Knit for Victory project until Thanksgiving, I got my first project finished!


It's Warm Jumper from A Stitch In Time Vol. 2. I was initially put off by this pattern because it looked boring but it knit up really quickly and is going to be a great basic!


I knit up the smallest size which the pattern notes is very short waisted. It worked out great for me since I am a bit short waisted and plan on wearing this only with vintage styles. The sleeves also came out a bit long so I think I'll knit them 1/2" to 1" shorter next go around.


I paired them with my brand new Freddies of Pinewood Norma Jeans which I snagged on sale over Christmas. They are super high waisted and I love them. They are a smidge big at the waist and I may need to take them in a bit but I'm going to see how a belt does first.


I opted for a bold red shirt for under the sweater to break up a bit of the blue of the rest of the outfit.


Overall it was a great comfy outfit for a chilly damp day.


I am really happy with this project and can't wait to finish my next Knit for Victory project!