Showing posts with label red peasant gown. Show all posts

Friday, March 7, 2014

HSF#5 Bodice

This is yet another Renaissance Fair costume fix, but this time on the bodice of my red peasant dress.


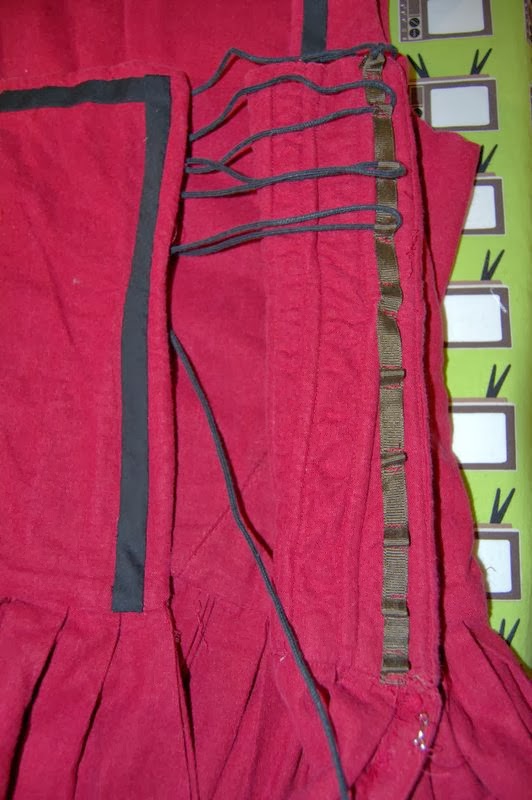
This is the original dress which closes with lacing rings. I opted for lacing rings since I still had yet conquered my mind numbing dread of hand sewn eyelets. Now that I'm an eyelet pro (or at least not a raw beginner!) I wanted to remove the lacing rings and do eyelets instead.


Also, after making my gray kirtle and tweeking the pattern a bit, I wanted to have more of a straight edge to the front rather than such a pronounced curve.


You can really see here exactly how curved that center front seam is!


Tada! New Bodice! It's still slightly curve but follows the bodice pattern 2.0 much better.


You probably also noticed that I still chickened out on the lacing rings. I opted for strips of ribbon with loops. I saw this done by Jen of Festive Attyre (alas, the page has gone missing....) and I thought I'd give it a try since I still didn't want to do eyelets....

It's still not perfect but one thing I've learned from historical costuming it's that the second one is always so much better. This one is improved and good enough.

The Challenge: #5 Bodice

Fabric: Red linen rayon (for the original kirtle no new fabric used)
Pattern: Self-drafted
Year: late 1500s
Notions: grosgrain ribbon (stash)
How historically accurate is it? fabric content is meh (no rayon this period) and eyelets would have been more period but I'm going with it looks more period on the outside than it did before so that's an improvement.
Hours to complete: 4 or so (this is why I hate adjusting things! Takes twice as long as making from scratch plus all of that seam ripping!)
First worn: not yet, I'll come back and add some photos of it on me during faire season
Total cost: $0

Friday, October 18, 2013

Another Day at the Faire

Unseasonably warm weather here in Ohio threw out my plans to wear my court dress this weekend, so lower class it was!


Love wearing this dress!


It's so comfortable to wear. and the linen is a great midweather fabric.


But it did get rather hot, so for much of the day, I wore the skirt tucked back into my belt.


It really helped cool me off and give better air flow. Plus I got to show off my petticoat.


 Faire Shopping!


I picked up this pretty necklace at the faire. It's so hard to find even vaguely period correct jewelry at the faire. I was looking for something gold tones with non-faceted stones. Success! Plus it matches my court dress.


I also picked up a copy of The Tudor Tailor! Can't wait to start making things from this book.

Huzzah for the faire!

Monday, September 16, 2013

Back in time


I made most of this costume last summer when I was planning on going to the KY Renaissance Festival which is earlier in the summer than the OH one and much warmer. Then it was 107F the weekend we were going to go so we skipped.


Then I wore it to Costume College '12 but it was on Sunday and I was much too beat for photos.


So we're skipping from WIP stage right to version 2.0 with new coif, sleeves and petticoat!


I had a lot of fun wearing this costume despite the fact that it was quite packed at the faire. There are still a couple of things that need to be tweeked here and there but mostly I'm happy.


One thing on my list for next season is a pair of more historically accurate shoes! Also to re-hem this petticoat. Somehow it ended up about 2 inches longer than my kirtle and it's supposed to be an inch or so shorter! Eeep! So I hastily pined up a new hem and sewed like mad in the car on the way there. I'm sure it's not a great hem job but it was functional.


It was sort of odd being at faire this year. My faire does NOT emphasize historical accuracy, particularly in the lower class. So I was a bit out of place being so covered. But it was a blessing in disguise because the lovely fall like weather made me completely forget about sunscreen and my poor face got all burnt! Yay for the new coif which protected my ears!


And can I just say how crazy comfy this dress is! It really makes me want to do more lower and middle class costumes and less court dresses!

Dress Diary: Red Peasant Gown

General Inspiration

Photos curtsey of Will Thorpe Intelligent Design

Wednesday, June 27, 2012

Advice Needed

Well, I've gotten my costume to the point where it's almost wearable. I'm just not sure I like the look of the lacing rings on the outside.


I think they look a bit garish on the outside especially since the lacking cord goes almost straight up and down.


My husband had the genius idea that I try it on inside out to see how I liked it. Much cleaner but there is still gaping under the bust. That's where all of the support comes from. I'm not sure if more lacing rings in that area or a different way of lacing or maybe just placing the lacing rings further away from the edge would help. 


I already have a caul to cover my hair but since I'm still a week and a half out from the event for this costume, I'll have time for some accessories. I could do a partlet which is this bit with the collar.

Or removable sleeves or a petticoat or an apron. Hmmm... decisions, decisions.


So do you like the rings outside?


Or inside? I think they'd need a bit more tacking down on the inside to help the fabric lay properly.

Monday, June 25, 2012

Bodice Construction: Part 2

Here are some pictures of my corded bodice on me so you can see how it fits.


It looks a bit wonky but this was super hard to pin together. The birds were helping. ;)


Lots of boning channels!


Some back wrinkles but I think my shorts were making it ride up. Plus the skirt will help hold everything down.


Look at that bust support! I'm not wearing a bra here, this is just the hemp and cut of the bodice doing all the work.


The skirt is 3 yds of linen that is pleated to be the width of bodice waist line. I used a combination of box and double box pleats. The front(ish) is single box pleated and the back(ish) is double back plated. I did measure out the front box pleats but just kind of eye balled the back ones and fiddled with them until the waistline was the correct length.


I'm super excited because the inside looks so pretty!


Boning channels on the inside.


I sewed on brass plated rings meant for drapes and curtains to use as lacing rings. I'm going to try and do a more period spiral lacing. I had planned on using some black wool from my stash to make trim but then I found three packs of black bias binding and decided that that would be much easier.


And here's the back.


Bird!


Another bird!

Sources:
corded boning: http://www.festiveattyre.com/research/cording/cord.html
pleating: http://www.elizabethancostume.net/pleats/
pleating layout: http://www.festiveattyre.com/research/diary/diary4.html
spiral lacing: http://www.festiveattyre.com/research/lacing/lacing.html
pattern drafted following (mostly) these directions:
           bodice: http://www.elizabethancostume.net/kirtlepat/
           skirt: http://www.elizabethancostume.net/makekirtle.html
Trim inspiration: http://www.festiveattyre.com/gallery/campi/wkclass.html

Wednesday, June 20, 2012

Bodice construction: Part 1


 So, after perusing the rather limited color selection of linen blends and (even smaller selection!) linen, I ended up purchasing this lovely red linen/rayon blend for my dress. I think it's 62/38 or 64/36 being more linen but I looked at so many I can't remember which. I also purchased a bit of navy for sleeves and natural for an corded petticoat. The linen was on sale 50% and I had a 30% off coupon to use on top of that so I decided to be ambitious.


 These pieces are actually the "lining" so to speak so that the cords don't sow through the front (I hope). It's interlined with cotton twill. I made 1/4" channels and used a doubled length of hemp cord for the boning. Not sure how that curvy one in the front is going to work out but I guess if all else fails, I can always pull the thing apart and remove it. I used a piece of jewelry wire that I bent to have a very thin hook on the end to thread the hemp. Wish I'd had thinner wire! It took up a bit much space in the channel and made the insertion process hard. My poor hands were killing me last night!


 I also cut out and interlined the back piece which will not have any cording. This is going to be a very interesting experiment and I hope it works! The twill alone did a pretty good job of supporting the girls but once I decide how to line this project (an therefore which seams to sew next!) I can try it on and see how things are coming along.


 Working on a major sewing projects with the birds around has been interesting.


 Not only do I have to make sure they are safe from things like pins and hot irons, but I have to make sure my work stays away from fresh bird turds.


 They adore playing with fabric and have adopted some of my scraps which is good because between the birds and the fabric cutting I've been doing lately, I desperately need to vacuum (which is what I ought to be doing instead of blogging....). Seriously, fabric and seeds everywhere! I just have to keep these gals away from my good pieces. But since I did just clean up my sewing space of all non-Renaissance related materials, it can all fit on my table.

Sources for the use of cord boning:
http://www.festiveattyre.com/research/cording/cord.html